


Friday, October 1, 2010

Thursday, September 30, 2010
Windows 7: How to Use Split Screen feature
If you're like me, you love multi-tasking and one of the featured benefits of Windows 7 is the split screen. Now this does come in handy when your trying to keep track of your fantasy football teams on Sunday's, which I do, so here is how you do it, courtesy of e-how.com

1. Open the documents or web sites you want to view side by side. If you want to look at two web sites side by side you will need to open 2 separate browser sessions not just have 2 tabs open on the same browser. That means you need to click the browser icon to open another browser session.
2. Go to the screen you want to view on the left. Hold the Windows icon key down. This is the key that has the windows 7 logo on it. It is usually in the bottom left of your keyboard. Hold the left arrow key at the same time you are holding down the windows icon key. This will move your first window to the left.

3. Go to the screen or document you want to display on the right. Repeat the steps above. Hold the Windows icon key down and the right arrow key at the same time. This will move your second open window to the right.
4. Hold the Windows icon key down and the up arrow key at the same time to maximize your window again. You will need to put your mouse on the screen or document you want to maximize and then press both keys down simultaneously.
Tuesday, September 28, 2010
BlackBerry PlayBook: New Rival to iPad?
BlackBerry released a promotional video on their new PlayBook due early next year. Samsung is also releasing the Galaxy Tab, which is also poised to be an Apple iPad competitor.
Here's a preview of the BlackBerry PlayBook. What do you think about it?
Here's a preview of the BlackBerry PlayBook. What do you think about it?
Monday, September 27, 2010
Does a Dual/Multiple Monitor Setup Increase Productivity?
 |
| 1337 battle station |
Personally, I prefer a dual monitor setup. I went from having three 17 inch monitors to a single 24 inch and now two 24's.
Does anyone else run a dual/multiple monitor setup?
Saturday, September 25, 2010
Drobo vs. ReadyNAS


For those looking for a home networked backup/storage system, the 2 products that immediately come up are Drobo and ReadyNAS. Both support RAID type technology and feature hot-swapping hard drives in case of failure.
Does anyone have experience with any of these products? What's a good recommendation for home networked storage?
Friday, September 24, 2010
Online Backup: Mozy or Carbonite?

In terms of online backup, there are two front runners: Mozy & Carbonite.
Mozy: http://mozy.com/
Carbonite: http://www.carbonite.com/
Both services require you to install their software on your PC or Mac so that it can do automatic backups of the files you'd like it to save. Mozy offers 2GB worth of backups for free and also has paid MozyHome and MozyPro plans. Carbonite's subscription includes pricing plans that range from 1 to 3 years.
Does anyone use any of these services? What are your thoughts on online backup?
Thursday, September 23, 2010
Xmarks: Sync your bookmarks between browsers and computers

Using it is very simple. Go to Xmarks' website and download the appropriate add-on for your browser here: http://download.xmarks.com/download/all . Next, create an Xmarks account and sync your bookmarks to the Xmarks cloud.
Once you have your bookmarks synced to the Xmarks cloud, all you have to do is install the Xmarks add-on to each browser and/or computer you use and sync that specific install with your Xmarks account. Whenever you add a new bookmark to any of your browsers, the change will sync to the cloud and then update when you open the other browsers on the same computer or different computer.
I've found Xmarks to be most helpful when using a work computer and home computer. If I'm using my work computer and find something that I want to bookmark, I just bookmark it the conventional way (protip: CTRL+D on PC and CMD+D on Mac are the default shortcuts for bookmarking in browsers), and when I open the browser on my home computer, it will sync with Xmarks and show my new bookmark.
 |
| Syncing is very easy with Xmarks. |
Xmarks also gives you the option of syncing your passwords. In regards to storing passwords, Xmarks says: "Password Sycnhronization encrypts your passwords using a secret PIN of your choosing before they ever leave your computer. This ensures that nobody but you, not even Xmarks, can gain access to your passwords." (On a side note, I store my forum passwords in Xmarks but not others since I like to think storing them in my head is most trustworthy.)
If you're currently a Xmarks user, have you had positive/negative experiences with this service? Please share your thoughts.
Wednesday, September 22, 2010
Internet Explorer 9 Beta is Available as of September 15, 2010

Last week, Microsoft released the highly-anticipated beta version of Internet Explorer 9. You can see the new features, take a test drive of the application, and download IE9 on Microsoft's official page located here: http://ie.microsoft.com/testdrive/
With the most recent release, Microsoft is hoping to gain back ground lost to Firefox and Chrome in recent years. What's your preferred/primary Internet browser? (See poll on the side.)
Has anyone downloaded and used the beta IE9? If so, what do you think about it?
TidySongs keeps your iTunes Clean
If you're an avid music lover as I am, you have hundreds and probably thousands of songs in your iTunes library. But with different computers and iPods, you may have double, triple copies of the same song or missing artwork... this is where Tidysongs comes in to save your music day.
 I first ran into this software when I was ripping my old CD's to my iTunes library, and depending on what program you were using, it would tag the song incorrectly or not tag it at all, and you would get the music stanza (which in my opinion can pretty annoying.) This can also be a problem if you do not use iTunes as a music store.
iTunes and other programs rely on correct information in your songs to find album art--not TidySongs. Even if your song names have misspellings or missing info, TidySongs' intelligent database technology will find the matching artwork.
Tidysongs also helps remove duplicate songs, fills in missing artists, and adds missing album art work. You can finally remove the music stanza image from your players display, all automatically. Tidysongs is available on both Windows and OSX and it is 39.99, which is a little pricey but it does get the job done and does it well.
For more information and download of a free trial version visit Tidysongs: http://www.tidysongs.com


iTunes and other programs rely on correct information in your songs to find album art--not TidySongs. Even if your song names have misspellings or missing info, TidySongs' intelligent database technology will find the matching artwork.
Tidysongs also helps remove duplicate songs, fills in missing artists, and adds missing album art work. You can finally remove the music stanza image from your players display, all automatically. Tidysongs is available on both Windows and OSX and it is 39.99, which is a little pricey but it does get the job done and does it well.
For more information and download of a free trial version visit Tidysongs: http://www.tidysongs.com

Monday, September 20, 2010
Dropbox: Managing Your Files Everywhere You Go
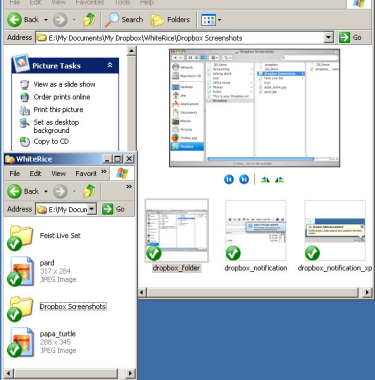
Managing files between computers and mobile devices has just got a lot easier with the help from the folks at Dropbox. Dropbox is service which allows you to store your files on a cloud network (which means an Internet-based network, whereby shared resources, software, and information are provided to computers and other devices on demand)

The benefits of Dropbox includes automatic syncing when new files or changes are detected, automatic backup of your files, and the ability to restore previous versions of your files.Dropbox is available for Windows, OSX and Linux a free Dropbox application for iPhone, iPad, and Android, which lets you access your files anywhere you go. For Blackberry users a mobile-optimized version of the website is also available for owners of Blackberry phones and other Internet-capable mobile devices.
Dropbox's pricing plans start with the Basic plan which is 2 GB of storage for free. A Pro 50 plan of 50 GB for 9.99/month and the Pro 100 of 100 GB for 19.99/month. Every time you refer a person to Dropbox, you get an extra 250MB added to your account for free with a maximum of 8GB.
For more information, visit Dropbox at http://www.dropbox.com/
Sunday, September 19, 2010
E-Readers And How To Get Them Working For You
Trying to get an e-book to an iPad or any other device (Sony e-reader, Nook, Kindle) can be difficult, but with this is simple program Calibre e-book management, reading your books from your devices will be harmonious.
What i like the most about Calibre is that it has a very simple interface that anyone can use, and it also can convert many of the popular formats such as PDF and EPUB with just a couple of clicks. It even searches a database that will help tag your files as well as find cover art and creates a separate file so that you can keep your original file and upload it to your device.
If you are using any iOS device (iPad, iPhone, iTouch), just open iTunes. Go to file, select add file to library, sync to your device, and that's it. The best part is that Calibre is free and is available on Windows, OSX, and Linux.
Below is a quick guide tour from the creator of Calibre. For more information, visit the homepage for Calibre: http://calibre-ebook.com/
Saturday, September 18, 2010
OS Virtualization (Parallels Desktop/VMware Fusion) vs. Bootcamp
If your only computer is a Mac, and you have a need to run Windows, you're faced with two options: use OSX's Bootcamp and boot into Windows or use virtualization software, such as Parallels Desktop or VMware Fusion.
Parallels Desktop 5 has been tested to be superior to VMware Fusion 3 (see comparison here) so I'll be talking about Parallels in this post. Also, Parallels Desktop 6 was recently released on September 14 and features a 64 bit engine, surround sound 5.1, and superior 3D graphics rendering speeds.
Bootcamp:
Installing Windows 7 in Bootcamp is fairly straightforward. After the installation is complete, reboot your computer and hold down the Option key to get the below screen. Select your Windows partition to load Windows.
The OSX installation disk does a good job of installing all the drivers needed for Windows 7. The only problem child is the graphics driver. When playing a video or a game, the computer begins to run very hot, and the fan is constantly on at full speed.
A software alternative is to download additional software to control fan speeds, or you can simply use a laptop cooling fan. Nonetheless, the overheating issues are a problem and a hassle.
On the flip side, using Bootcamp to run Windows 7 is advantageous because all of your system's processing resources are dedicated to the running OS.
Parallels Desktop:
I currently have Parallels Desktop 5 on my computer (I will be upgrading to version 6 soon), and the installation was also straightforward. The graphics drivers work well, and I haven't experienced additional overheating. Parallels also allows Windows 7 to run Aero Peek as you get a more accurate rating on the Windows Performance Index (version 4 features outdated graphics drivers that disable Aero Peek due to the Windows Performance Index graphics rating of 1.0 regardless of hardware). The sound is a little softer compared to the volume in OSX; however, the difference is slightly noticeable.
When running the virtual machine, you can choose different views: window view, full screen view, and coherence. The coherence view allows you to run the Windows programs as if they were standalone programs in OSX. This is my favorite feature.
Parallels gives you the option of customizing the system resources to the VM. You can chose a single core or multiple cores and also choose how much RAM you want to dedicate to the VM.
The only disadvantage to using Parallels to run Windows 7 is that you can never dedicate all of the hardware resources to the operating system since OSX is always running in the background; however, with customizable resource profiles and improved graphics performance in version 6, this should not be much of an issue.
The Verdict:
Parallels Desktop is such an efficient VM application that I removed my Bootcamp partition and haven't regretted it one bit. Version 6 is aimed at PC gamers who have Macs and need maximal graphics performance.
If you absolutely have to run Windows on your Mac, Parallels Desktop is the best way to go. If you just bought a Mac, miss your Windows functions, and have no specific application or gaming need for Windows, suck it up and learn OSX... after all, that's what this blog is for.
The price is $79.99, while the upgrade option (needs version 5) costs $49.99. Parallels Desktop's product page is located here: http://www.parallels.com/products/desktop/
Parallels Desktop 5 has been tested to be superior to VMware Fusion 3 (see comparison here) so I'll be talking about Parallels in this post. Also, Parallels Desktop 6 was recently released on September 14 and features a 64 bit engine, surround sound 5.1, and superior 3D graphics rendering speeds.
Bootcamp:
Installing Windows 7 in Bootcamp is fairly straightforward. After the installation is complete, reboot your computer and hold down the Option key to get the below screen. Select your Windows partition to load Windows.
 | |
| Hold down the Option button at reboot when you see the white screen to activate this menu. |
The OSX installation disk does a good job of installing all the drivers needed for Windows 7. The only problem child is the graphics driver. When playing a video or a game, the computer begins to run very hot, and the fan is constantly on at full speed.
A software alternative is to download additional software to control fan speeds, or you can simply use a laptop cooling fan. Nonetheless, the overheating issues are a problem and a hassle.
On the flip side, using Bootcamp to run Windows 7 is advantageous because all of your system's processing resources are dedicated to the running OS.
Parallels Desktop:
I currently have Parallels Desktop 5 on my computer (I will be upgrading to version 6 soon), and the installation was also straightforward. The graphics drivers work well, and I haven't experienced additional overheating. Parallels also allows Windows 7 to run Aero Peek as you get a more accurate rating on the Windows Performance Index (version 4 features outdated graphics drivers that disable Aero Peek due to the Windows Performance Index graphics rating of 1.0 regardless of hardware). The sound is a little softer compared to the volume in OSX; however, the difference is slightly noticeable.
When running the virtual machine, you can choose different views: window view, full screen view, and coherence. The coherence view allows you to run the Windows programs as if they were standalone programs in OSX. This is my favorite feature.
 |
| Coherence view in Parallels Desktop 6 |
Parallels gives you the option of customizing the system resources to the VM. You can chose a single core or multiple cores and also choose how much RAM you want to dedicate to the VM.
The only disadvantage to using Parallels to run Windows 7 is that you can never dedicate all of the hardware resources to the operating system since OSX is always running in the background; however, with customizable resource profiles and improved graphics performance in version 6, this should not be much of an issue.
The Verdict:
Parallels Desktop is such an efficient VM application that I removed my Bootcamp partition and haven't regretted it one bit. Version 6 is aimed at PC gamers who have Macs and need maximal graphics performance.
If you absolutely have to run Windows on your Mac, Parallels Desktop is the best way to go. If you just bought a Mac, miss your Windows functions, and have no specific application or gaming need for Windows, suck it up and learn OSX... after all, that's what this blog is for.
The price is $79.99, while the upgrade option (needs version 5) costs $49.99. Parallels Desktop's product page is located here: http://www.parallels.com/products/desktop/
Thursday, September 16, 2010
MacDrive: Using both NTFS and FAT32 formatted disks on Windows systems
My personal computer is a MacBook Pro, but my work computer is a Lenovo T400. When I purchased my MBP, I came across a problem: how do I seamlessly swap files back and forth?
My PC is joined to a corporate domain, so I did not want to mess with the settings and join it to my home network and enable file sharing.
An immediate solution was to use Dropbox and link both computers to my account. The only problem was that my free account was maxed out at 2GB, and if I wanted to move a big file (say 500mb), I'd have to move it into the Dropbox, wait for it to upload onto the cloud, and then wait for it to sync with the other computer... it was quite time consuming.
OSX uses the FAT32 file system, while Windows uses the NTFS file system. OSX is able to read NTFS drives but not write to them. Windows 7 does not recognize FAT32 drives at all. At this point, I could transfer files from PC to Mac (put the files from PC on the NTFS external hard drive and then plug into Mac) but not the other way around. Also, my main external 2TB hard drive is also my OSX Time Machine backup drive. Since Windows 7 is not natively able to read FAT32 disks, I didn't have the capability to move my large files from the 2TB drive to PC.

I came across MacDrive, and it's a Windows application that allows Windows to read from and write to FAT32 drives. The installation is quick and simple, and the program runs in the background, taking up about 2MB of RAM. MacDrive solved my file swapping dilemna, and both my Mac and PC are able to read and write to my 2TB external hard drive. It is the only program that I found that's easy and simple to use.
MacDrive retails for $49.99 for a single license. The official website is located here: http://www.mediafour.com/products/macdrive/
My PC is joined to a corporate domain, so I did not want to mess with the settings and join it to my home network and enable file sharing.
An immediate solution was to use Dropbox and link both computers to my account. The only problem was that my free account was maxed out at 2GB, and if I wanted to move a big file (say 500mb), I'd have to move it into the Dropbox, wait for it to upload onto the cloud, and then wait for it to sync with the other computer... it was quite time consuming.
OSX uses the FAT32 file system, while Windows uses the NTFS file system. OSX is able to read NTFS drives but not write to them. Windows 7 does not recognize FAT32 drives at all. At this point, I could transfer files from PC to Mac (put the files from PC on the NTFS external hard drive and then plug into Mac) but not the other way around. Also, my main external 2TB hard drive is also my OSX Time Machine backup drive. Since Windows 7 is not natively able to read FAT32 disks, I didn't have the capability to move my large files from the 2TB drive to PC.

I came across MacDrive, and it's a Windows application that allows Windows to read from and write to FAT32 drives. The installation is quick and simple, and the program runs in the background, taking up about 2MB of RAM. MacDrive solved my file swapping dilemna, and both my Mac and PC are able to read and write to my 2TB external hard drive. It is the only program that I found that's easy and simple to use.
MacDrive retails for $49.99 for a single license. The official website is located here: http://www.mediafour.com/products/macdrive/
Tuesday, September 14, 2010
Steermouse: Using your multi-button PC mouse on a Mac
If you've recently purchased a Mac computer but prefer your old multi-button PC mouse (Logitech, Microsoft, etc), Steermouse serves as a software solution allowing you to take advantage of your mouse's full functionality on OSX.
Official Steermouse website: http://plentycom.jp/en/steermouse/
Having used Apple's Magic Mouse for a month, I just found it to be highly uncomfortable and a hassle to use. Although it supports multi-finger gestures, the side-swiping forward and back motions did not feel natural and jarred the mouse from side to side. It made me long for my trusty Logitech Anywhere Mouse MX.
By default, the Logitech mouse works on OSX; however, the use of the shortcut button underneath the scroll wheel and the forward/back buttons on the side were disabled. Steermouse enables this functionality, and it allows you to customize the action of each button.
At only $20 US for a single computer license, it's a bargain considering the savings versus buying a trendy $70 Macbook accessory... the Magic Mouse.
Official Steermouse website: http://plentycom.jp/en/steermouse/
Having used Apple's Magic Mouse for a month, I just found it to be highly uncomfortable and a hassle to use. Although it supports multi-finger gestures, the side-swiping forward and back motions did not feel natural and jarred the mouse from side to side. It made me long for my trusty Logitech Anywhere Mouse MX.
 |
| The Logitech Anywhere Mouse MX paired with a Macbook Pro |
By default, the Logitech mouse works on OSX; however, the use of the shortcut button underneath the scroll wheel and the forward/back buttons on the side were disabled. Steermouse enables this functionality, and it allows you to customize the action of each button.
 | |
| Buttons 6, 7, and 8 allow other buttons, besides the fwd/back ones, to be customized. |
At only $20 US for a single computer license, it's a bargain considering the savings versus buying a trendy $70 Macbook accessory... the Magic Mouse.


